Blog
Docker for Data Scientists: Part 3
Tue 21 August 2018 by Jeff FischerThis is a why-to and how-to guide to using Docker in your data science workflow. It is the companion text to the talk I gave at the PyBay Conference in San Francisco on August 18th. Given its length, I have spread this text out over a three-post series. This is the final post.
Outline
Here is an outline of the entire series:
Part 1: August 14 (available here):
Part 2: August 18 (available here):
Part 3: August 21 (today's post):
To follow along at home, running code for all the examples is available in a GitHub repository: https://github.com/jfischer/docker-for-data-scientist-examples.
Workflow 3: Running a Jupyter Notebook
Now, we will run TensorFlow and a Jupyter notebook in a container. TensorFlow is a fairly complex stack, so running a container built off their base image will save us a lot of trouble. Here is the overall build and run process:
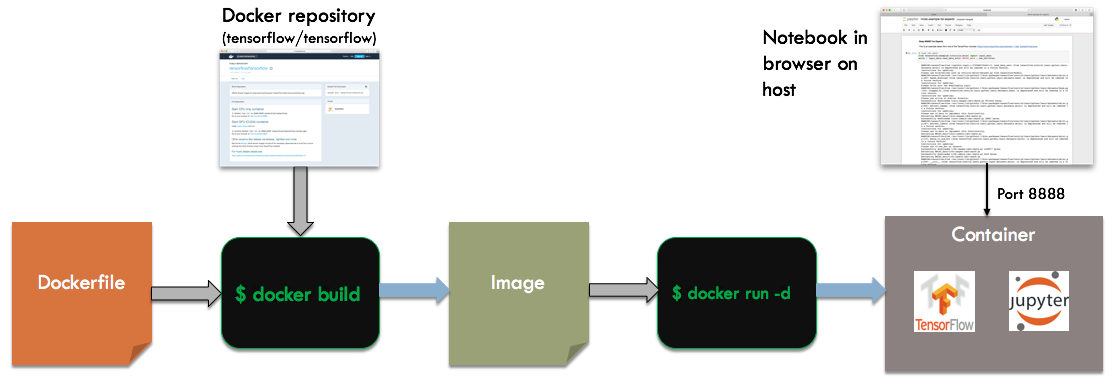
We start with a Dockerfile that builds of the tensorflow/tensorflow base image. When running the container, we specify -d for detached mode instead of -it. This will cause the container to run independently of the invoking shell, as a server process. To talk to the container, we will map the network port used by Jupyter, 8888, to the host. We can then connect to the notebook via a browser running on the host.
Dockerfile
The Dockerfile for this example is short and simple:
FROM tensorflow/tensorflow:latest
COPY mnist-example-for-experts.ipynb /notebooks
ENV PASSWORD test

WORKDIR "/notebooks"

CMD ["/run_jupyter.sh", "--allow-root"]
We will start with the tensorflow base image and copy in a Juypter notebook from the current directory. This notebook contains one of the TensorFlow deep learning examples. I have used it as a CPU vs. GPU benchmark in the past. We will copy it to /notebooks, a directory of Jupyter notebooks present in the base image.
The ENV PASSWORD test line sets the PASSWORD environment variable to test. This is to provide a default password to Jupyter. It should be fine for your personal machine, but you should try something more secure if you are running on an open port in the cloud. We will see such an example shortly.
The CMD directive specifies that we should execute the run_jupyter.sh script (provided by the base image). This script will run until you shut down Jupyter or the container itself.
Shell Commands
Here are the commands to build and run this workflow:
docker pull tensorflow/tensorflow

docker build -t pybay-workflow-3a .

docker run -d -p 8888:8888 --name workflow-3a-container pybay-workflow-3a:latest
In the run command, there are two differences from our prior examples:
- We are using -d to run in detached mode.
- The -p 8888:8888 option specifies that we want to map port 8888 in the container to port 8888 on the host.
Running the Commands
When we run the commands, we get the following output:
$docker pull tensorflow/tensorflow
Using default tag: latest
latest: Pulling from tensorflow/tensorflow
Digest: sha256:f73015504e3af53e9f747defdc2e2d857baa1140dd3cfdf92136051072502a67
Status: Image is up to date for tensorflow/tensorflow:latest
$ docker build -t pybay-workflow-3a .
Sending build context to Docker daemon  26.62kB
Step 1/5 : FROM tensorflow/tensorflow:latest
 ---> 2c8d1fd8bde4
Step 2/5 : COPY mnist-example-for-experts.ipynb /notebooks
 ---> Using cache
 ---> af4750aeab12
Step 3/5 : ENV PASSWORD test
 ---> Using cache
 ---> 615323d4b8a3
Step 4/5 : WORKDIR "/notebooks"
 ---> Using cache
 ---> fab65e003ee4
Step 5/5 : CMD ["/run_jupyter.sh", "--allow-root"]
 ---> Using cache
 ---> 250a7cabd682
Successfully built 250a7cabd682
Successfully tagged pybay-workflow-3a:latest
$docker run -d -p 8888:8888 --name workflow-3a-container pybay-workflow-3a:latest
62e246c5b8ce6c2573e5c7146ba067caeb8e920b4f67a5a8d19ec0fe536859be
$
Note that, when we execute the run command, Docker prints a long hex string (an id for the container) and then exits. The container is still running, just in the background. We can see that, by running a docker ps command (kind of like the Unix ps command for listing processes):
$ docker ps
CONTAINER ID        IMAGE                      COMMAND                  CREATED             STATUS              PORTS                              NAMES
62e246c5b8ce        pybay-workflow-3a:latest   "/run_jupyter.sh --a…"   2 minutes ago       Up 2 minutes        6006/tcp, 0.0.0.0:8888->8888/tcp   workflow-3a-container
$
So, we can see that it is running. If we connect our web browser to http://localhost:8888, we see a page like this:
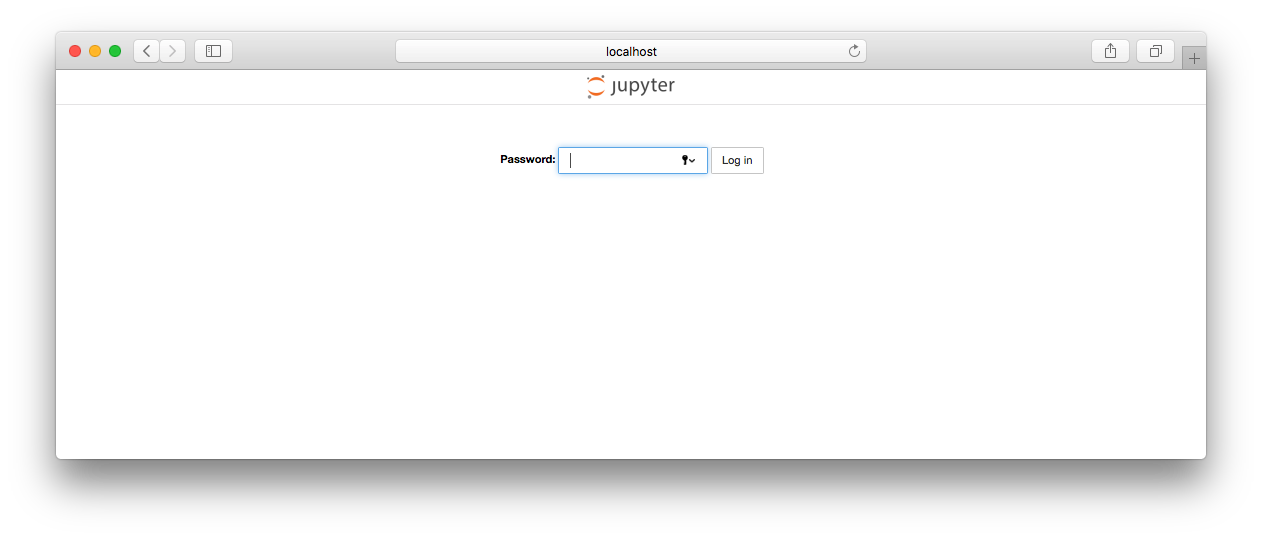
If we enter the password we specified in the Dockerfile ("test"), we should now see a Jupyter page with a list of notebooks:
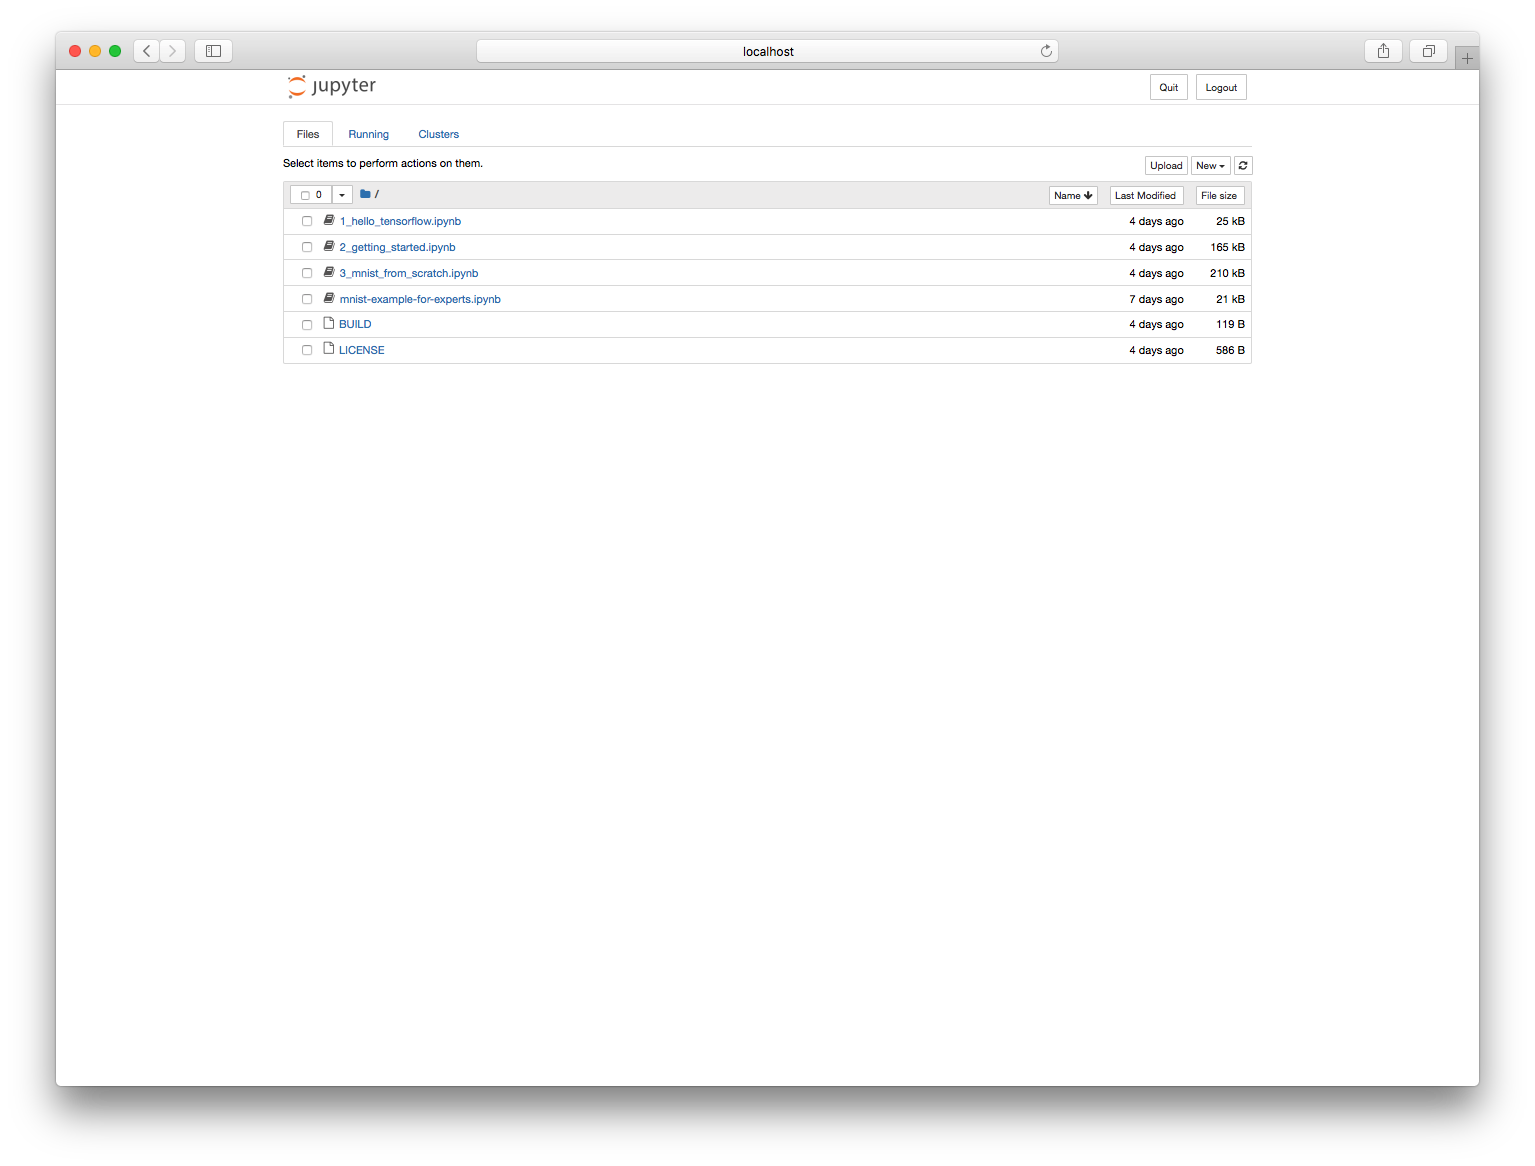
We can pick our notebook and start running it.
A more secure way to set the password
We hard-coded our password to "test" in the Dockerfile. Since it was specified as an environment variable, we can actually override this when we run the container. Here is an example script that interactively prompts the user for a password and runs the container, setting the password in docker run:
echo -n "Please enter a password for Jupyter:"
read -s PASSWORD
echo
echo docker run -d -p 8888:8888 --env PASSWORD=***** --name workflow-3a-container pybay-workflow-3a:latest
docker run -d -p 8888:8888 --env PASSWORD=$PASSWORD --name workflow-3a-container pybay-workflow-3a:latest
With this approach, we can even take the password out of the original Dockerfile and just ask the user when starting the container.
Pitfall: Container Dies Just After Startup
Perhaps you are running a detached container just like the above example, but when you go to the web browser, you get a "Can't connect to the server" error. So, you run docker ps, but see nothing:
$ docker ps
CONTAINER ID        IMAGE               COMMAND             CREATED             STATUS              PORTS               NAMES
$
What do you do? First, you can run docker ps -a. The -a option tells Docker that you want to see a list of all container on the machine, even those not currently running. We now see our container:
$ docker ps -a
CONTAINER ID        IMAGE                      COMMAND                  CREATED              STATUS                          PORTS               NAMES
fc2e76d251f5        pybay-workflow-3a:latest   "/run_jupyter.sh --a…"   About a minute ago   Exited (1) About a minute ago                       workflow-3a-container
Ok, so we know that it exited just after startup. How do we debug this? The simplest way is to run the container in interactive mode instead of detached mode. We should see any error messages logged to the console. Here is an example:
docker run -d -p 8888:8888 --name workflow-3a-container pybay-workflow-3a:latest
The Jupyter HTML Notebook.

This launches a Tornado based HTML Notebook Server that serves up an
HTML5/Javascript Notebook client.
...
[C 18:26:27.008 NotebookApp] Bad config encountered during initialization:
[C 18:26:27.008 NotebookApp] Unrecognized flag: '--allowroot'
$
From this, I can tell that the Jupyter startup script was passed a bad option: --allowroot instead of allow-root. I can fix this and rebuild my container.
Debugging a running container
There are times when you have a running detached container, and you want to poke around in it. The best way to do this via the docker exec subcommand, which runs a (shell) command inside a running container. Here's an example for our Jupyter notebook container:
$ docker exec -it workflow-3a-container /bin/bash
root@9fd5d385cf80:/notebooks# pwd
/notebooks
root@9fd5d385cf80:/notebooks# ls
1_hello_tensorflow.ipynb  2_getting_started.ipynb  3_mnist_from_scratch.ipynb  BUILD  LICENSE  mnist-example-for-experts.ipynb
root@9fd5d385cf80:/notebooks# ps -ef
UID        PID  PPID  C STIME TTY          TIME CMD
root         1     0  0 18:30 ?        00:00:00 bash /run_jupyter.sh --allow-root
root         7     1  0 18:30 ?        00:00:00 /usr/bin/python /usr/local/bin/jupyter-notebook --allow-root
root        31     0  0 18:33 pts/0    00:00:00 /bin/bash
root        41    31  0 18:33 pts/0    00:00:00 ps -ef
root@9fd5d385cf80:/notebooks# exit
$
You do not have to run an interactive shell, you can directly run any executable available in the container. If you are running something interactive (like the shell), be sure to specify the -it options.
Pitfall: GPU Access
Perhaps you tried running this TensorFlow notebook on a machine with one or more GPUs. Since TensorFlow supports GPU execution, it should just use the GPU, right? No. It is not quite that simple!
By default, Docker does not see the GPU installed on your machine. There are a few things you need to do first to run your containers on your Linux box with GPU access:
- Install the Nvidia GPU driver for Linux. You will need the actual proprietary version from Nvidia, the open source ones will not work for this use case.
- Install nvidia-docker, a Nvidia plugin for Docker, using the instructions at https://github.com/NVIDIA/nvidia-docker
- Pick a base image that has the CUDA libraries and other dependencies for your framework (e.g. tensorflow/tensorflow:latest-gpu)
This is only supported on Linux - Nvidia does not support Docker on Mac or Windows.
In the example code, workflow-3b adapts workflow 3 to run on a GPU.
Although this is a few more steps than running only on the CPU, I have found that it is still much easier than dealing with the GPU library dependencies yourself.
Workflow 4: Load and Run a Database
In a data science project, one might want to use various analytics tools, including specialized databases, to preprocess our data. It would be helpful to automate the setup of these resources as well. In our last workflow, we will demonstrate the automatic creation, loading, and startup of a Neo4j database using Docker containers. Neo4j is a popular open source database designed specifically for graph data. Similar approaches can be used for other popular databases.
In the figure below, we see an overview of the automation steps:
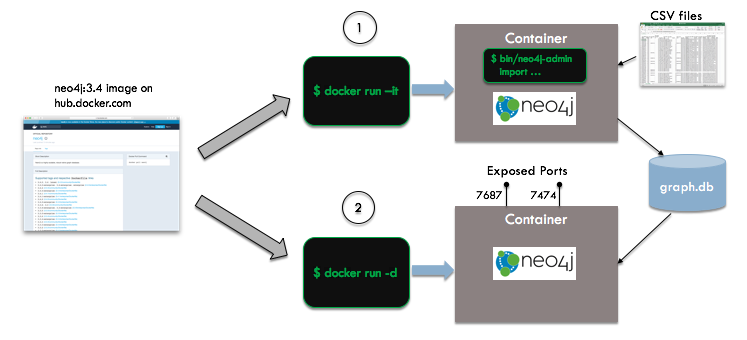
We start with the vanilla Neo4j image from Docker Hub - we do not need to create our own unique image for this example. Neo4j's bulk import facility requires that you put your data in a specific format (using CSV), run a the import utility to create the database, and then start the server. If your Neo4j database server has already been started, the import will fail. To handle this, we will create two containers, an ephemeral import container running in interactive mode and a long-lived database server container running in detached mode.
The import container will map three local directories to container volumes:
- ./graph-import-files contains the CSV files to be loaded and will be mapped to /imports
- ./data is for the database files and will be mapped to /data
- ./logs is for log files and will be mapped to /logs
The database server container will map two of these directories to container volumes:
- ./data will be mapped to /data
- ./logs will be mapped to /logs
Shell Commands
Automating this scenario is a little more complex than the previous ones, but still can be done in a 40 line shell script. This script may be found in the Git repo at workflow-4/run.sh.
We start by pulling the image from Docker Hub and recreating some directories:
docker pull neo4j:3.4

rm -rf ./data ./logs
mkdir ./data
mkdir ./logs
Now we need to do a little shell magic to get the names of the CSV files we will import and adjust their paths to be under /imports (as they will be seen within the container). The result of this step is the definition of two environment variables, $NODES_ARGS containing the importer command line arguments for node files and $EDGES_ARGS containing the importer command line arguments for edge files. Here is the bash code:
pushd  ./graph-import-files
for f in nodes-*.csv
  do
      echo "Processing $f"
      NODES_ARGS="$NODES_ARGS --nodes /imports/$f"
 done
  for f in edges-*_to_*.csv
  do
      echo "Processing $f"
      EDGES_ARGS="$EDGES_ARGS --relationships /imports/$f"
  done
popd
Now, we can run the first container to create the database from the CSV files:
docker run -it --rm \
   --volume=`pwd`/data:/data \
   --volume=`pwd`/graph-import-files:/imports \
   --volume=`pwd`/logs:/logs \
   --env=NEO4J_AUTH=neo4j/test \
   neo4j:3.4 bin/neo4j-admin import $NODES_ARGS $EDGES_ARGS
Finally, we can create the database server container:
docker run -d \
   --volume=`pwd`/data:/data \
   --volume=`pwd`/logs:/logs \
   --env=NEO4J_AUTH=neo4j/test \
   -p 7474:7474 -p 7687:7687 \
   --name pybay-neo4j neo4j:3.4
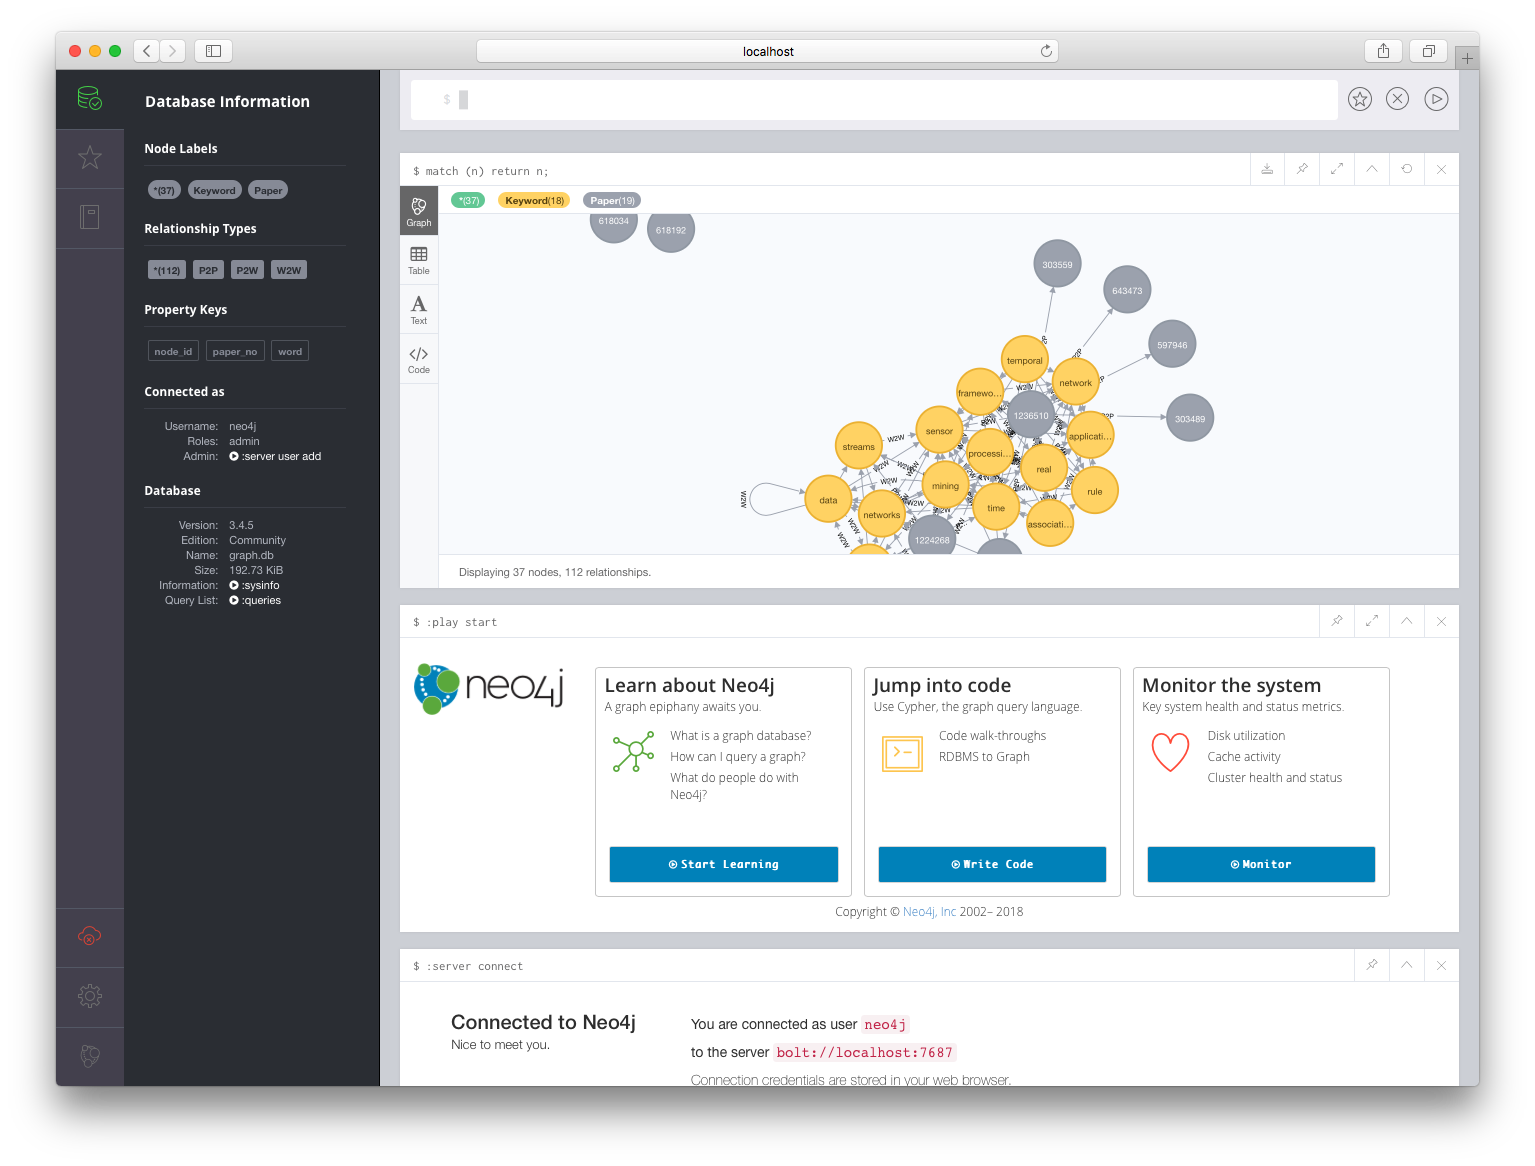
The Neo4j browser based query UI is on port 7474 and the database client/server connections happen on port 7687. If we connect our browser to http://localhost:7474, and enter the username and password (specified via environment variables as neo4j/test), we should be able to log into the running database. We can enter the query match (n) return n; at the prompt to display all the nodes of our graph. It should look something like this:
Conclusion
In summary, Docker is a powerful tool that can help automate not just large scale app deployment, but also data science workflows. Container-based automation can eliminate much of the pain in setting up complex data science software. Through Dockerfiles and Docker images, you can reproduce a prior state of your software stack for reproducibility or to share your work with your colleagues. The Docker repository infrastructure and Docker Hub specifically, allow you to build on the work with others without having to figure out the individual installation steps for your dependencies.
We have seen these benefits in action with four workflows: running individual Python scripts, running an interactive shell, running compute services like a Jupyter notebook, and running stateful services like a database. We also saw several pitfalls that you should take care to avoid. Hopefully, you can learn from my mistakes!
Thank you for taking the time to read this series. If you have any questions, feel free to contact me by email at jeff at this blog's domain or through Twitter at @fischer_jeff. For future content like this, follow me on Twitter or on LinkedIn at https://www.linkedin.com/in/fischerjeff. I hope to hear from you!
Docker for Data Scientists: Part 2
This is part 2 of my why-to and how-to guide to using Docker in your data science workflow. It is the companion text to the talk I will be giving at the PyBay Conference in San Francisco this afternoon (August 18th). The final post in this series will appear on …
read moreDocker for Data Scientists: Simply your workflow and Avoid Pitfalls
This is a why-to and how-to guide to using Docker in your data science workflow. It is the companion text to the talk I will be giving at the PyBay Conference in San Francisco on August 18th. Given its length, I am spreading this out over the next week in …
read moreSlides and Video from My PyData Seattle 2017 Talk
Here are the slides from the talk that I gave yesterday at PyData Seattle. The video from the talk has been uploaded by the PyData organizers to YouTube at https://youtu.be/rlMb-xwLVUg.
If you found the talk interesting, you might check out these links:
- ThingFlow: https://thingflow.io
- Code …
IoT Talk at BayPiggies, Next Thursday Oct 27
I will be giving a talk on Python and IoT next Thursday, October 27, 2016 at the monthly BayPiggies (Bay Area Python Interest Group) meeting.
read more