Docker for Data Scientists: Part 2
Sat 18 August 2018 by Jeff FischerThis is part 2 of my why-to and how-to guide to using Docker in your data science workflow. It is the companion text to the talk I will be giving at the PyBay Conference in San Francisco this afternoon (August 18th). The final post in this series will appear on Tuesday August 21.
Outline
Here is an outline of the entire series:
Part 1: August 14 (available here):
Part 2: August 18 (today's post):
Part 3: August 21 (available here):
To follow along at home, running code for all the examples is available in a GitHub repository: https://github.com/jfischer/docker-for-data-scientist-examples.
Workflow 1: Build a Python Script
This example may be found in the workflow-1 directory of the example code repository. We have a simple scikit-learn machine learning script called iris.py. It loads the famous Iris data set, consisting of (iris) flower pictures. We split the data into training and testing sets, train a Support Vector Classifier, and then score how well it does against our test data. Here is the actual code:
#!/usr/bin/env python3
# Scikit-learn Iris example

from sklearn import datasets
from sklearn.model_selection import train_test_split
from sklearn import svm

# load the data
iris = datasets.load_iris()
X, y = iris.data, iris.target
X_train, X_test, y_train, y_test = train_test_split(X, y, test_size=0.2)

# Train a Support Vector Classifier
clf = svm.SVC()
print(clf)
clf.fit(X_train, y_train)

# Classify the test data
accuracy = clf.score(X_test, y_test)
print("Accuracy is %0.3f" % accuracy)
We want to run this in an emphemeral container that only exists for the duration of the script execution. Of course, we do not want to bother installing a particular version of Python or the scikit-learn libraries on our system. Here is an overview of the steps and files involved:
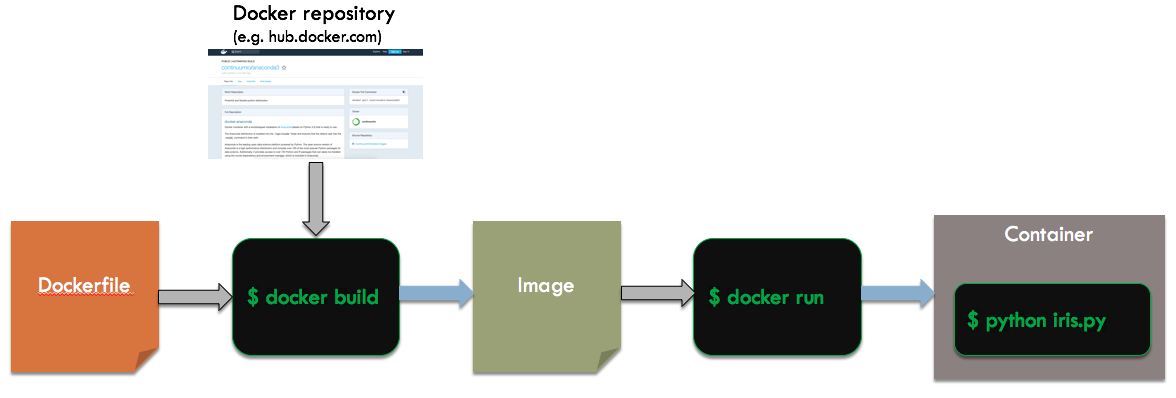
We start with a dockerfile, which is a file (usually named Dockerfile) that contains a recipe for building a particular container. It is a sequence of directives which typically modify the state of the container. Docker uses a layered approach, where containers can start with a base container and then apply their own unique changes (sort of like single inheritance in object oriented programming). This can be very powerful and time saving.
Given the Dockerfile, we will run the Docker command line tool (called docker, of course) to create an image. Specifially, we will use the build subcommand, which takes as inputs a Dockerfile and a base image (potentially from a remote repository like Docker Hub), and outputs an image for our container. This image is then used by the run subcommand of docker to instantiate a container. This container will run Python on our script and output the results to the shell.
Dockerfile
Here is what the Dockerfile for our example looks like:
FROM continuumio/anaconda3:latest
RUN mkdir /scripts
COPY iris.py /scripts

CMD /bin/bash
The FROM directive tells Docker that we want to use a base image containing the Anaconda3 distribution of Python. This image may be found on Docker Hub, at https://hub.docker.com/r/continuumio/anaconda3/. The part after the colon (latest) is a tag indicating which version of a given image we want. latest is a special tag for the most recently built image from a Docker file.
The RUN directive runs a shell command, which in this case, will create a directory scripts at the root of the file tree in our container. The COPY directive then copies the file iris.py from the current directory on our host machine into the /scripts directory in the container. Finally, the CMD directive indicates that the default command to run in the container, if one is not specified on the command line, shoud be the bash shell.
Shell Commands
Let us now build the image and run the container. We will do this from the bash command line. Here are the commands:
docker pull continuumio/anaconda3

docker build -t pybay-workflow-1 .

docker run -it --rm pybay-workflow-1:latest /opt/conda/bin/python /scripts/iris.py
The docker pull command ensures that we hae the image named continuumio/anaconda3 tagged latest downloaded from Docker Hub onto our local machine. The build command builds the image using the file named Dockerfile in the current directory (indicated by the "."). The -t pybay-workflow-1 instructs docker to name the image pybay-workflow-1. By default, it will be created with the latest tag.
Finally, the run command creates a new container from our image and runs python on our iris.py script. Note that the paths for the Python executable and the script are with respect to the file tree inside of the container, not the host's file tree. The -it options indicate that we want to run this container interactively in our current command line session. The container will stop when the command (the Python script) completes. The --rm option indicates that we want the container to actually be destroyed when it stops. Otherwise, it would stay around and could be used again. For simple scenarios like this one, creating and destroying containers is so cheap that we might as well create a new one every time.
Command Output
Here is what we see when we run these commands:
$ docker pull continuumio/anaconda3
Using default tag: latest
latest: Pulling from continuumio/anaconda3
Digest: sha256:e07b9ca98ac1eeb1179dbf0e0bbcebd87701f8654878d6d8ce164d71746964d1
Status: Image is up to date for continuumio/anaconda3:latest
$ docker build -t pybay-workflow-1 .
Sending build context to Docker daemon   5.12kB
Step 1/4 : FROM continuumio/anaconda3:latest
 ---> a9090db7be5a
Step 2/4 : RUN mkdir /scripts
 ---> Using cache
 ---> 317f51a0fbf6
Step 3/4 : COPY iris.py /scripts
 ---> Using cache
 ---> 77e27352f802
Step 4/4 : CMD /bin/bash
 ---> Using cache
 ---> a9e809ba1ff4
Successfully built a9e809ba1ff4
Successfully tagged pybay-workflow-1:latest
$ docker run -it --rm pybay-workflow-1:latest /opt/conda/bin/python /scripts/iris.py
SVC(C=1.0, cache_size=200, class_weight=None, coef0=0.0,
  decision_function_shape='ovr', degree=3, gamma='auto', kernel='rbf',
  max_iter=-1, probability=False, random_state=None, shrinking=True,
  tol=0.001, verbose=False)
Accuracy is 0.900
On my MacBook Pro, this completes in 3.4 seconds! The first time you run the docker pull, it may take longer, as it needs to download the image over the internet. Subsequent runs will just check that the local copy is up to date.
Running the Shell in this Container
Instead of calling our Python script directly in the docker run command, we can also execute a bash shell and then call our script from within the container. This might be useful if we want to run more than one command in the context of our container or do some exploration. For example, maybe I want to call the iris.py script a few times to see whether the accuracy score changes much:
$ docker run -it --rm pybay-workflow-1 /bin/bash
(base) root@8722c59f8d2a:/# cd /scripts
(base) root@8722c59f8d2a:/scripts# ls
iris.py
(base) root@8722c59f8d2a:/scripts# python iris.py
SVC(C=1.0, cache_size=200, class_weight=None, coef0=0.0,
  decision_function_shape='ovr', degree=3, gamma='auto', kernel='rbf',
  max_iter=-1, probability=False, random_state=None, shrinking=True,
  tol=0.001, verbose=False)
Accuracy is 1.000
(base) root@c8a038036eca:/scripts# python iris.py
SVC(C=1.0, cache_size=200, class_weight=None, coef0=0.0,
  decision_function_shape='ovr', degree=3, gamma='auto', kernel='rbf',
  max_iter=-1, probability=False, random_state=None, shrinking=True,
  tol=0.001, verbose=False)
Accuracy is 0.967
(base) root@8722c59f8d2a:/scripts# exit
$
Workflow 2: Run a Development Session
For our second workflow, we want to do development work in our container environment. We will install a text editor (in this case vi, but you could also use nano or emacs) to make it easy to edit code. We will run the bash shell instead of our Python script.
Pitfall: Data Changes in Your Containers
Here is a simple Dockerfile based on our first workflow that installs the vim editor into our container:
FROM continuumio/anaconda3:latest
RUN apt-get -y -q install vim-tiny
RUN mkdir /scripts
COPY iris.py /scripts

CMD /bin/bash
We can run this as follows:
docker pull continuumio/anaconda3

docker build -t pitfall-1 .

docker run -it --rm pitfall-1:latest /bin/bash
The last command will create the container and put us into the shell. Let us run it and go into the shell to edit our iris.py file. We will add a loop around our script to run it 5 times.
$ docker pull continuumio/anaconda3
Using default tag: latest
latest: Pulling from continuumio/anaconda3
Digest: sha256:e07b9ca98ac1eeb1179dbf0e0bbcebd87701f8654878d6d8ce164d71746964d1
Status: Image is up to date for continuumio/anaconda3:latest
$ docker build -t pitfall-1 .
Sending build context to Docker daemon   5.12kB
Step 1/5 : FROM continuumio/anaconda3:latest
 ---> a9090db7be5a
Step 2/5 : RUN apt-get -y -q install vim-tiny
 ---> Using cache
 ---> 0318cb6294ce
Step 3/5 : RUN mkdir /scripts
 ---> Using cache
 ---> f7ced4720768
Step 4/5 : COPY iris.py /scripts
 ---> Using cache
 ---> 3e38ced7f694
Step 5/5 : CMD /bin/bash
 ---> Using cache
 ---> 286693ea2372
Successfully built 286693ea2372
Successfully tagged pitfall-1:latest
$ docker run -it --rm pitfall-1:latest /bin/bash
(base) root@4c1e496bcddd:/# cd /scripts
(base) root@4c1e496bcddd:/scripts# vi iris.py
We edit the script to look like this:
#!/usr/bin/env python3
# Scikit-learn Iris example

from sklearn import datasets
from sklearn.model_selection import train_test_split
from sklearn import svm

# load the data
iris = datasets.load_iris()
X, y = iris.data, iris.target
for i in range(5):
    X_train, X_test, y_train, y_test = train_test_split(X, y, test_size=0.2)

    # Train a Support Vector Classifier
    clf = svm.SVC()
    #print(clf)
    clf.fit(X_train, y_train)

    # Classify the test data
    accuracy = clf.score(X_test, y_test)
    print("Accuracy is %0.3f" % accuracy)
Now, we exit the editor and run the script:
(base) root@4c1e496bcddd:/scripts# python iris.py
Accuracy is 0.933
Accuracy is 0.967
Accuracy is 0.967
Accuracy is 1.000
Accuracy is 0.967
We are done for now, let's exit:
(base) root@4c1e496bcddd:/scripts# exit
$
Wait, I wanted to make a change, let's go back to our container:
$ docker run -it --rm pitfall-1:latest /bin/bash
(base) root@4c1e496bcddd:/# cd /scripts
(base) root@4c1e496bcddd:/scripts# vi iris.py
But wait, my changes to the file are gone! Yes, we changed the file in the container, not on our host system. The container was ephemeral (started with --rm) and was destroyed as soon as we exited it. Perhaps you are thinking, but I will just take the --rm off the command line and do my development in the container. But, it is so easy to accidentally delete one of your containers. Do not worry, there is a better way.
Workflow 2: The Right Way
Instead of changing files inside of our container, we are going to mount a directory from the host file system into our container. Any changes we make inside the container will be reflected in the host file system and last beyond the lifetime of the container. Here is an overview of the build and run process:
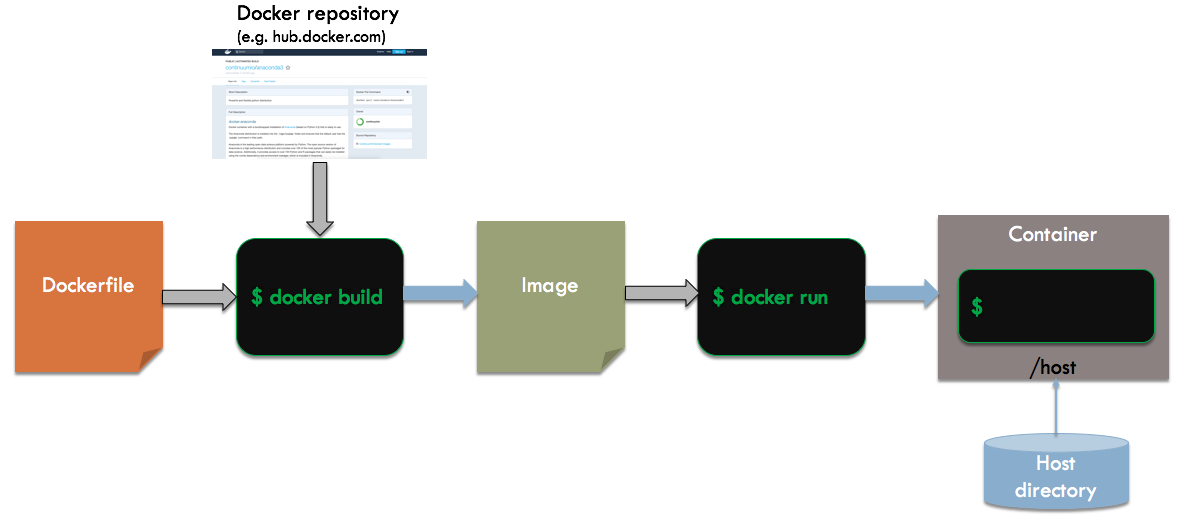
The process is the same as before, except that we will mount the current directory to /host within the container.
Dockerfile
Here is what the Dockerfile for this example looks like (found at workflow-2a/Dockerfile if you are following along at home with the Git repo):
FROM continuumio/anaconda3:latest
RUN apt-get -y -q install vim-tiny
VOLUME /host
WORKDIR /host
CMD /bin/bash
Like our pitfall example, we will install vim. We use the apt-get command, because we know that the continuumio/anaconda3 base image uses a Debian flavor of Linux.
We add a VOLUME directive to tell Docker that we will be mounting something at /host in the file tree. We also make /host the current working directory when we enter the container through the WORKDIR directive.
Shell Commands
Running our container is very similar to the pitfall example. Here are the commands:
docker pull continuumio/anaconda3

docker build -t pybay-workflow-2a .

docker run -it --rm -v `pwd`:/host pybay-workflow-2a:latest /bin/bash
The main difference is the addition to the docker run command line: -v `pwd`:/host. The -v option (which can also be written as --volume) indicates a mapping between directories or files on the host and within the container. The `pwd` is shell syntax to run the pwd command and use its results in the containing shell command. For example, if my current directory is /home/joe/python, then the result will be -v /home/joe/python:/host.
Running the Shell
Now, let us run the commands and get into our container shell:
$docker pull continuumio/anaconda3
Using default tag: latest
latest: Pulling from continuumio/anaconda3
Digest: sha256:e07b9ca98ac1eeb1179dbf0e0bbcebd87701f8654878d6d8ce164d71746964d1
Status: Image is up to date for continuumio/anaconda3:latest
$ docker build -t pybay-workflow-2a .
Sending build context to Docker daemon   5.12kB
Step 1/5 : FROM continuumio/anaconda3:latest
 ---> a9090db7be5a
Step 2/5 : RUN apt-get -y -q install vim-tiny
 ---> Using cache
 ---> 0318cb6294ce
Step 3/5 : VOLUME /host
 ---> Using cache
 ---> 020af7d43a6a
Step 4/5 : WORKDIR /host
 ---> Using cache
 ---> 288a04d0470f
Step 5/5 : CMD /bin/bash
 ---> Using cache
 ---> 12cab22dc6ce
Successfully built 12cab22dc6ce
Successfully tagged pybay-workflow-2a:latest
Entering docker shell, type "exit" to return back to host shell
$ docker run -it --rm -v /Users/jfischer/code/docker-for-data-scientist-examples/workflow-2a:/host pybay-workflow-2a:latest /bin/bash
(base) root@249b7bceddaf:/host#
Great, now we can make the same changes to our script as before (run the body in a loop), run the script, and exit:
(base) root@249b7bceddaf:/host# vi iris.py
(base) root@249b7bceddaf:/host# python iris.py
Accuracy is 0.967
Accuracy is 1.000
Accuracy is 0.967
Accuracy is 0.967
Accuracy is 1.000
(base) root@249b7bceddaf:/host# exit
$
Now, take a look at the script in your current directory on the host. It has the changes you made in the container! You can make changes to your heart's content in the container without fear of losing them. Some other things you can do with this approach:
- You can use a graphical editor or IDE on the host to edit your code. When you are ready to build, test or execute your code, you can run those steps in an ephemeral container that mounts the current directory.
- The host directory might represent a git repository. You can commit and push code either from the host or from within your container.
Pitfall: Access Permissions
Perhaps you tried the previous example out, but found that your container did not have write permissions to the file iris.py or any other file under /host. I ran into this problem at a client, and it stumped me. It turns out that there is an option --userns-remap on the Docker daemon. When this option is enabled, it will run every container in a unique subuser, for further isolation and security. Although it is available in the Community Edition of Docker for Linux, it is disabled by default. However in the Enterprise Edition of Docker for Linux, it is enabled by default (on Docker for Mac and Docker for Windows, the --userns-remap option is not available, so this is not an issue).
How do you make your directory editable if this option is enabled on the Docker daemon? It turns out that there is an option in on the docker run command to force Docker to use regular host users: --userns=host. We can use the same Dockerfile as before and just adjust the run command as follows (see workflow-2b for the full code):
docker run -it --rm --userns=host -u `id -u`:`id -g` \
    -v /etc/group:/etc/group:ro -v /etc/passwd:/etc/passwd:ro \
    -v `pwd`:/host pybay-workflow-2b:latest /bin/bash
There were a few extra options on that command line which need explaining:
- -u `id -u`:`id -g` tells Docker to use the current user and effective group as the user and group for running inside the container. This makes sure we are mapping it as ourselves. If my user was jfischer and my group admin, I could have also specified this as -u jfischer:admin.
- -v /etc/group:/etc/group:ro -v /etc/passwd:/etc/passwd:ro tells Docker that I want to map the username and password files from the host to the container. That way, the name to id mappings will be consistent across both.
Running with Mapped Users
Here is what the output looks like when we run our container with this user mapping:
docker run -it --rm --userns=host -u 1000:1000 \
-v /etc/group:/etc/group:ro -v /etc/passwd:/etc/passwd:ro \
-v /home/jfischer/code/docker-for-data-scientist-examples/workflow-2b:/host pybay-workflow-2b:latest /bin/bash
jfischer@4c77f49e15e9:/host$ whoami
jfischer
We should now be able to edit host files with the same permissions as the host user.
Next Post: Part 3
Thanks for reading part 2 of this series. Part 3 is now available! To continue reading, click here.